So if you read the post below this one, you'll have seen that I've been working on this printer cabinet like the one being sold by Restoration Hardware.

Jen Woodhouse over at House of Wood, had Ana White draw up some plans for her after seeing this cabinet. I liked Jen's so much, and got such inspiration from her, that I decided I wanted one too! My husband was kind enough to humor me and lend a hand.
Here is Jen's:

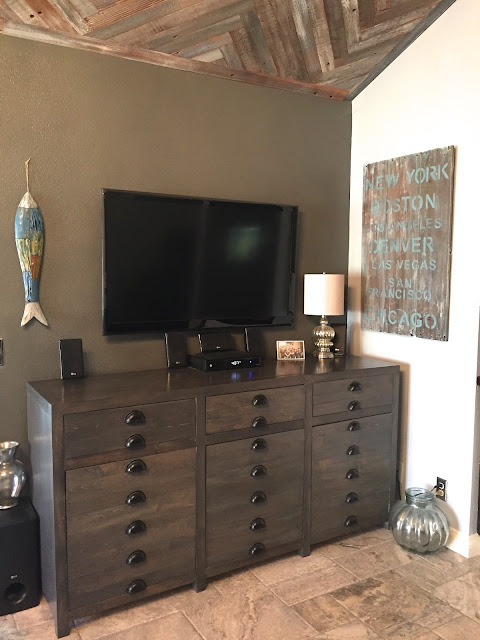
Here is my finished version:

There is no sense in me reinventing the wheel, so, for the actual plans, go to Ana's site.
For the actual step-by-step, go to Jens site. Both of these women are absolutely amazing!
I made a few changes and will touch on those. I also made mistakes!
If I had to build another one, it would be easier!
So please, if you plan on doing one of these, follow closely! I will save your sanity!
So please, if you plan on doing one of these, follow closely! I will save your sanity!
Wood: I wanted something different. I didn't want to use pine or douglas fir. I walked around
the lumber yard and found some rustic alder that I liked. But,,,,,They don't make 2X2's, 1X2's and 1X3's.in alder. No problem. If you have a table saw
, it works fine and you can rip your own. If you don't, the yard will rip them for you, for a price! I ended up getting some boards that were 2" thick, and boards that were and 1" thick. Probably 6-8 10 ft boards total. All total, the wood came to about $350-400.
, it works fine and you can rip your own. If you don't, the yard will rip them for you, for a price! I ended up getting some boards that were 2" thick, and boards that were and 1" thick. Probably 6-8 10 ft boards total. All total, the wood came to about $350-400.


It was an absolute mess.
All that sawdust is from ripping the boards. Here I'm ripping some 1X2's and 1X3's that will make up the drawer fronts.

This is the front and back of the frame. Everything was joined using glue and Kreg Jig.
 |
| Ana's plans! |
 |
| Error here....the plans say hide the Kreg holes on the inside...Hubs skipped that part. The only ones you can see are when you open the doors. |

Here is the basic frame already put together. It went pretty quickly. Like Ana and Jen says, you MUST check for square as you go! It's difficult! All 3 of these openings are just a little different. They vary from 1/2 to 1". I don't know why. It just turned out like that . This top actually fits inside rather than an overhang. You can choose to put it on or wait until the end. It didn't seem to make it more difficult to work this way.

So here are the drawers. Make sure they're square! Attach your sides and make sure everything fits.
I used luan for the drawer bottoms. Your 1x2's/3's will screw on to the front of this.

These are the 1X2's and 1X3's, glued and clamped. The vertical strips of wood are screwed in to each
slat. Measure the door opening and cut to size. This is why it is so important for your
opening to be square, otherwise you will be shaving off pieces so the door swings
freely and you aren't left with big gaps.
opening to be square, otherwise you will be shaving off pieces so the door swings
freely and you aren't left with big gaps.

Here's the part I like. Sanding and finishing. After the glue is dry, remove the clamps and start
sanding. I think I started with 80 grit before I actually glued them. If you have some high spots, using a rougher grit and gradually work up to 150 or 220. Make sure you get all the glue off! Better yet, when you glue, make sure it doesn't ooze out onto the side that you are staining. Glue prevents the stain from penetrating, no matter how much you sand it off. Trust me on this one!

If you don't, you will end up with blotchy marks where the stain got absorbed differently. Besides, pre-conditioning will also raise the grain again. wait about 5-10 mins and lightly sand (by hand this time) with a 220 to knock it back down. Your final finish is only as good as your steps here.
Do not take short-cuts!
For the actual stain, I wanted a weathered, rustic gray. I love the Varathane. But it can look a little
cloudy and ghost-ish (yeah I know,,,not a word). I mixed it with some ebony. You will want
to try your stain on a piece of scrap first. If you do mix, make sure you mix enough at the time. You will never be able to mix the same formula again if you run out 1/2 way through.

A seal coat. Use it. Don't know why this marked down, but it was a good deal.
I always use a seal coat after I stain. It locks in the stain and makes for a much nicer surface.
Did you know that you can use this on your wood that you are going to paint as well?
Use the shallac version seal coat on mahogany to prevent bleed throughs. The seal coat allows the paint to go on so much more smoothly too. After the seal coat dries, lightly, very lightly, sand with some fine steel wool. Just to knock down any bumps.Use your hands to feel while you sand. Do NOT sand down to the stain. If you go too far and sand off some of the stain, it's a whole other process to restain the wood. Trust me on this one!!!

Can you see from the pic how smooth the wood looks? After the final finishing, it's like glass! So, after the seal coat comes the finish. I like this Deft. You can thin it with water if it's too thick for you. I like it better than the Poly finishes from minwax. I like the way it goes on and it dries very quickly. I put it in another container so I don't contaminate the main can any debris I may pick up. Splurge on a top quality brush. And keep that brush just for finishes. Don't use one you paint with! There will always be minute particles of paint or dust in the bristles and it will show up on your finish.

I applied 4 coats of finish to the top. In between each coat you must sand. I used the wet sand paper at 1000 grit. Lightly moisten and lightly sand the finish. Wipe off and apply the next coat. By the 3rd or 4th coat, it should feel as smooth as a baby's bum!
 |
| Remember what I mentioned about the glue?? Those spots on the drawer are just that. I sanded the heck out of it too, but it seeped into the wood. Just make sure to avoid glue oozing. |

I only did 4 coats on the top. Everything else got the same treatment, but only 1 or 2 final coats.

I wanted the middle drawer to pull down so I could hide the DVR player. I decided to paint the
inside drawer, as well as the inside bottom shelf, with milk paint. I painted
directly over the stain but before the seal coat.
inside drawer, as well as the inside bottom shelf, with milk paint. I painted
directly over the stain but before the seal coat.

The bottom pic I used ultra marine and mixed it with the above turquoise. You really won't see it
once I get the shelves and junk in there! But I just wanted to try out the paint mix!

The hinges I found at HD. Non-mortise concealed inset. I would recommend doing all your
drilling and hardware placement BEFORE you stain. I didn't have the items on hand, so I did it after. One of those mistakes I mentioned earlier. lol The handles were ordered from Overstock. I got 25 and used 21. Drilling for these handles was an absolute nightmare. There is no template available.
The actual posts of the handles go into the wood and get screwed on from inside.
OMG. The measuring took what seemed like hours! I'm fanatical about getting everything even and level, so that didn't help. Are they all even?? Not a chance. Don't look real closely! I suck at this part. I asked the other half to do it for me as well as the hinges.
After this was done, I don't think I'll be asking him for help anymore! WHEW!


This was the process for attaching the handles. Mark off center, measuring off the distance for the holes (this one was 1 1/2" left and right from center, attach the tape, make your lines drill and pray!
Not the high point of this project, to say the least!

We attached the same hinges for the pull down drawer front. Didn't have to make a front of the drawer like the others. The hinges were attached directly to the 1X2's and 3's.

Here is how it looks all hooked up! A small hole was drilled in the back for the wires.
I used a sheet of luan for the back panel. I plan on adding some shelves,,,,eventually!


And that my friends, completes this project! Hope you enjoyed it. If I can answer any questions, feel free to ask! Thanks for visiting!
Linking up to all my faves below plus :My Repurposed Life , FunkyJunkInteriors,
chiconashoestring budget,betweennapsontheporch.net , my uncommon slice of suburbia, The Dedicated House , new house new home new life, Coastal Charm, The Shabby Creek Cottage, From my front porch to yours, House of Hepworths, Primitive&Proper
What an amazing project! It looks beautiful and is a fabulous knock off! Megan
ReplyDeletewow! doesn't it feel great to make something so pretty and functional with your own two hands?
ReplyDeletegreat job!
gail
Wow, this is fantastic! I wouldn't even dream of taking on a project this big - you rock!
ReplyDeleteHOLY CANOLI! it's amazing!
ReplyDeleteWow, I can't believe you built it from scratch! Love the way you used concealed hinges on the doors. I've seen a few cabinets like this with faux drawers that have visible side hinges on the doors. Having them hidden makes the drawers look so much more realistic.
ReplyDeleteI've been looking for a pre-existing piece to give this type of treatment to for a while. I can't imagine attempting to actually build one - too big and scary for me.
I can't believe you made this from scratch! It looks amazing. Thanx for sharing at THt!
ReplyDeleteNice design. Recently i purchased a printer. I was planning to buy a computer desk. This desk design is simple n sobber. i liked it.
ReplyDeletenanotechnology products
I am SO IMPRESSED that you build from scratch. Who taught you? I my day (I'n age 62) I'd begged my father to teach me how to do thing/make things and I only got, "Girls don't need to know how." I even tried taking shop class in 1967 and they would not let girls in the class. I've been mad ever since! So I focused on teaching myself how to refinish and paint and then how to make handmade plant paper artwork.
ReplyDeleteWhat a beautiful piece this is. CONGRATULATIONS!
Donna Allgaier-Lamberti / White Oak Studio Designs / SW Michigan
Hand-Painted Vintage Furniture Transformations
Blog: http://smallhouseunderabigsky.wordpress.com
Facebook: donnaallgaierlamberti@facebook.com (To see a portfolio of painted pieces for sale)
Yours looks amazing! I love that you made a hinges drawer for the center compartment.
ReplyDelete