Sunday, September 11, 2016

Stain art on a Frenchie

Sigh, I finally got around to completing what I started four months ago. I blame the weather!! I work in my garage. And when it's 100 outside, it's 95 in the garage. even at 10 at night. Anyway, here it is.....(click on photos to see a bigger picture)
Yes I know. Not terribly bad. Except it was grungy and filthy! And there are a million more like it. So time to mix it up a bit....

I have done many other custom art wood stain designs on the tops of my pieces. It was time for another. Lets start from the beginning, eh??

A thorough cleaning,scrub down, and then lots of sanding! The top was taken off with a stripper. Soy Gel. Sanded and wiped, and then I drew out my flower design. 

Use chalk. If you mess up, a wet rag takes it right off. And when you are done staining, you can wipe off the lines and no one will ever know! 
I can't really tell you how to do this. It's all just an individual thing. I mix my colors, I mix my shading, I sometimes go over it w/other shades, I mix two together,,,,just do it. 
Sometimes I blend with a rag, sometimes the brush. If your lines get covered w/stain, take some sandpaper and sand on the lines to clean them up. Then it comes out something like this when you are finished. 

 For the rest of the top, I used GF Spiced Walnut,,,or maybe it was Java. I really don't know. I had 7 different stains that I mixed and played with.  The top was sealed with GF wipe on Urethane. for sure. 
The body was done with ASCP Ochre. I used Greek blue in some of the corner distressing. 

Handles got sprayed w/a MM silver and Rustoleum Pure Gold mixture. 


I even did a matching nightstand (no stain design tho). Still have to wax it.  sigh.


Thursday, July 28, 2016

Antique tall dresser in that gorgeous shade of blue!

Cobalt Blue. My fave color. And The Real Milk Paint Co has the most gorgeous shade of that blue, hands down. So many people ask what color this is. Blue Lagoon. And that's just what it looks like. 

Two coats of paint and two coats of tung oil. Bam! 

A decent dresser from the very early 1900's. Some nice burled walnut. I chose to go w/a two tone because the walnut was in decent condition. Not sure of the top. Maybe elm or ash. 

I only have a 'few' of their paints!
Don't freak when you apply the paint. It's going to look dull. In the picture you see the dried paint and then the area where the oil has been applied. Their tung oil and citrus solvent mixture are the best. And non toxic! I mix mine in an old glass jar with a tight lid. I also added a little of the dark tung oil. 


Out on my patio where I have the Mexican tile. Goes perfectly! 
Tommy


The tung oil puts it's own finish onto the piece. 3-5 coats is enough to give it a good sealing.
 Much like a wax coating. 

This was one of my earlier milk paint pieces I did, and one of the few that I kept. I mean, look at that hardware. Hello????!!!! Couldn't sell this one. Besides cobalt, this turquoise is my next fave. I've probably used this color on 6 different pieces and they've all sold quickly. 
This is Aqua:

Still looks good after 4 years. 

If you have any questions about the paint, check out their site or talk to Dwayne over there. 
Tell him I sent you! 


Sunday, June 26, 2016

Another ornate 70's dresser!

 I love doing these 1970 dressers, but the prep work is ridiculous! Because these are made with a laminate type coating, painting can be challenging. Prep work is imperative on these. 

Heres what I started with. Lovely. You can't be too zealous w/the sanding or else you go through these mdf tops and end up w/a very rough, nonsandable surface. 
All of the drawers had this factory finish that was peeling. I had to hand-sand every single drawer! Can you say, "nightmare"?  Took me hours and hours to get these smooth. 

Then after priming, I had to go back and smooth them by sanding again. And sometime priming again! I was really hating the day I brought home this thing. 

But after all was said and done, it did clean up nicely. 
The handles got a spray of Metallic Rose Gold by Rustoleum. Goes perfectly with the pink. 

I used my Fine Paints of Europe Eco line in a "Ballet Pink" color.  No bubblegum pink for this lady. 
This piece can be used by a girl of any age! 


And of course my signature paint on the drawers! I used Berry for the middle and a medium gray for the outer drawers.  Again, Everything was sanded, primed and painted. Because I used a glossy paint, every piece of lint and hair will show. Before I paint, I even have to prep my garage area by sweeping and mopping the floor down with water to get the dust to settle. Look at that reflective top! And I brushed it, not sprayed. I gave it at least 6 coats with plenty of fine sanding in between coats. That's the only way you can get a fine, smooth finish. Try wet sanding with a 600 grit. 


Wednesday, April 27, 2016

Another Ceruse Project!

It's been awhile since I've taken on a ceruse technique on another dresser, but when I came across this vintage oak piece with the great grain detail, I knew I had to work on it! This time, I chose a turquoise color instead of black. 
 For the original post I did on how to ceruse, click HERE  and HERE 

Ok, lets see what I started with! Feast your eyes! 

           Yeah I know, why in the world would I ever want to cover up this gem? Oh stop! 
 I'm going to jump ahead and let you peek right quick at the finished piece,,,,just so you will follow along and wonder, " How in the heck did you turn that 'thing' into THIS":

Well, first off, lots o' stripping w/my fave stripper. Why people insist on using chemicals when this perfectly fine, natural, non-chemical product is available, I'll never know. This Soy Gel cleans up with water! Does Citri-strip do that?? Can you use your bare hands?? No. 'Nuff said. 

Now would be a good time to click on the link above if you have no idea about cerusing. It's too involved to go into again.  I'll be here when you're done.  Ga'head' 
Got it now? 
Ok, lets go on.At this point, I though I would just do the top and the two drawers. Here it is,

Wednesday, March 30, 2016

Another Horrendous Waterfall???!

Just how many horrendous waterfall desks are out there??? Apparently quite a few! I did one years ago, HERE, that actually amazed me! I can't believe how forgiving wood can be. And now, this one..
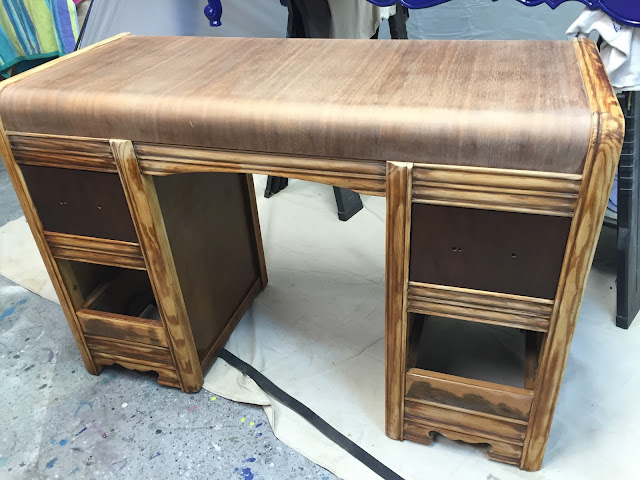
        I have no idea what people do to their furniture in order to get it to look like this!  On the very bottom scalloped molding on the left side, you can see where a piece is missing. I had to glue this piece (at least they saved it) on so it would match the right side.  See the 5th picture for the result.
 In the below picture, you can see how it all looks after stripping off the whole mess!  The wood was on some sort of plastic or resin underlayment. Very weird. I've never seen anything like it. The top and drawer fronts are walnut and the rest is made of pine.  Very light piece.  Only the parts that were to be stained got an entire stripping. The pine part was sanded only until everything felt smooth to the touch. It all got sprayed with a shellac. It also got a coat of red primer to help the black paint look better. When you apply your paint directly onto the wood without primer, it can look splotchy and rough. You must have a base coat primer before applying your paint. I used the red primer because I used black paint. 
Quite a diff, eh?? 

I used General Finishes Spiced Walnut stain and semi gloss wipe on Arm r Seal for top coat. 
The black is GF Lampblack Milk Paint. 

The handles got sprayed in a soft gold. 
I actually used a small artists' paint brush to do the small round molding on the edging and some of

Tuesday, March 29, 2016

Vintage Apothecary Cabinet

Oh the stuff one finds in obscure places! 
My husband happened upon a burnt out house/yard that was destroyed by an illegal marij. grow house!!  Laying around the burnt out litter, was this little gem! 
 I have no idea how it got to be this color. I put it in the 80 year old range just from the way is was made. so I sanded the top and sides and applied some stain. c-below. 

I tried out some new milk paint colors, layered them, put some wood sealer on all the interior drawers and after the paint dried, I sanded and applied tung oil.
I thought it would be a cute thing to hang on the wall and fill the drawer
 with cute little plants!


looks cool in my garden too
I took pics w/this guy all over the house!