Sunday, November 24, 2013

Another Kent Coffey

Behold the Kent Coffey from The Continental line. 
Normally I'm good about before shots, but not this time. 
It wasn't in horrible shape. It's just that the 55 year old finish is really not happenin' anymore! 
You can see the drawers before and after I sanded. Like most of the others, this is a walnut veneer.
 Lovely blotchiness yeah??! I always use a pre-conditioner before I stain (and this proves exactly why you should). But I'm thinking I waiting too long and it had already been absorbed and dried. This was not good. Even sanding it again didn't work. I had to use a varnish stripper to get the stain to release. 
Just extra work for me. I was able to get most of it up and with another sanding, got it to look passable. 

Normally I do a lot of two-tone, but I really like how the walnut finished up on this one. But just to
add a bit of color, I did the trim around the drawers in custom mix orange. This dresser was already
spoken for by a friend of mine. She's doing her room in charcoal grays, whites and a touch of orange.
One of the knobs went MIA in transit, so I found these cool replacements from Anthro.

Sunday, November 10, 2013

The Ming. What a MCM find!!

If you are into mid century furnishings, then you know Kent Coffey. 
He made some wonderful, top quality pieces. I saw this one on CL, but didn't think much of it. 
Until, I saw the same one in black on 1stdibs going for $8900!  Say what???!!
1stdibs is an online, high-end designer goods showcase.  Many designer stores in the big cities list their inventory on this site. Needless to say, I called the guy on CL to see if it was still avail. I won't tell you what I paid for it, but it was a killer deal. 

The one pic below is the one for sale on 1stdibs. I liked it in black. So I copied

And here is mine!!! Not bad, eh??

But I'm getting ahead of myself. Lets watch the transformation. 
 By far the most difficult and time consuming part, was this hardware. And there was a lot of it! I took off each piece and marked it's place. I've found that it's always best to put certain hardware back in it's original place. It just fits better. These were so grimy! 
I used Krud-Kutter to clean them and then steel wool and a metal cleaner (Brasso and Mother's) to try and take off the tarnish. I knew I was going to spray them with a metallic paint, but I didn't want to spray over this gunk. It won't hold up. 
So after many, many hours ( I spread this process out over a period of weeks) here's what I 
ended up with:
Just a tad better. Now these just didn't get sprayed once and put back on. Oh no. They were sprayed, then finely sanded with steel wool, then sprayed again. Sometimes a third time if there were bad spots. Then they got a final coat of sealer. Yes, even the screws were sprayed. 3 parts to each pull. 
There were 18 pulls. Uh-huh. Count with me.  MISERY!! 

Now the wood part. This dresser has a mahogany base. The wood finish was in bad condition. Could I have just primed and painted over it? Well yes. 
Would it have looked like poop? Well yes. 
Your finish is as only good as your base. I used a glossy latex enamel. In black. It's gonna show ever mar and bump.  So I sanded off every bit of existing finish until I got to raw wood. 
Pristine. 
You don't want to paint over raw wood. I applied a wood sealer. And sanded again. 
I sand so much, it probably explains why I could use my own hands as sandpaper. 
In the garage and the finished top. I believe I did spray a coat of gray primer. 
And I think it got 3 coats of black. I did brush it on and it came out very nice. No marks.

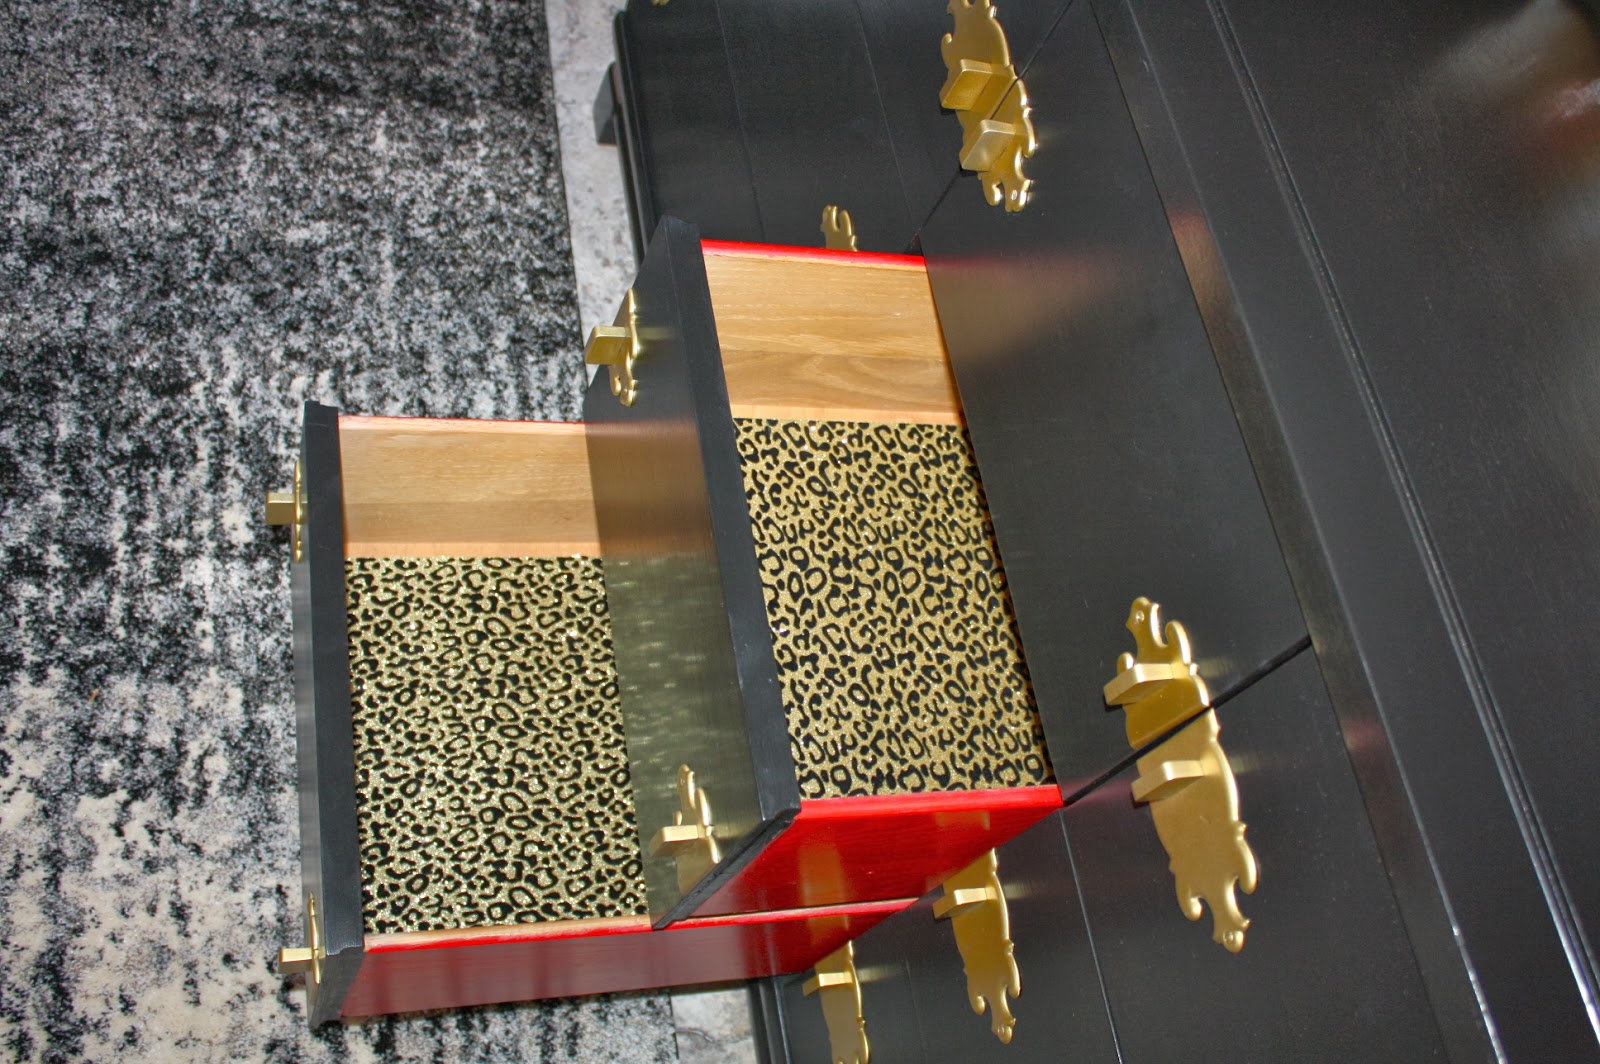
 I really like to add a pop of color to the sides of the drawers. It's just my thing. 
Red just seemed to be it. 
And just because, I put some scrap book paper in the middle drawers to go with the red. 
 This does have a matching mirror I have to get to. With about 10 of these handle things on it! 
So not looking forward to that again. 


I'm going to contact a store in LA to see if they would buy this to put on 1stdibs.
That other one is in Palm Beach, Fla. 


Linking up at my fave parties!! :
Kammys Korner - Trash to Treasure Tuesdays
Domestically Speaking - The Power of Paint Party
The Shabby Creek Cottage - Transformation Thursday
Miss Mustardseed - Furniture Feature Friday
Funky Junk Interiors - Saturday Night Special
Knick of Time Interiors - Knick of Time Tuesday
My RePurposed Life                                        


Monday, November 4, 2013

Antique Hutch in Milk Paint

Been so busy with the mid century stuff, I've totally neglected doing the antiques.
I found this mahogany hutch w/some walnut inlays awhile back. The lady said
it had been in her family since way back (I always like asking the history of pieces!) 
She had recently had it shipped out here from Minnesota. 
 The glass in the door was missing, as were bits of veneer here and there. 
The legs were quite scuffed. I love doing milk paint on antiques and thought the 
new color I got, light turquoise, would be perfect. 
In chalk paint tones, Duck Egg and Provence, would be close. 
This piece chipped to the max!! Normally I've done the milk paint on oak. I think this was my first mahogany. But as with the other paints, if you are going light you must prime! The tannins bleed thought on milk paint as well. There was also a shiny finish on the wood that had to be sanded. I guess I just could have added the bonder to the milk paint and got max adhesion, but I had to sand anyway.  To stop the bleeding, I chose to prime with a wood sealer-shellac. Too bad they don't make a clear primer :( 
 Obviously I didn't want white primer showing through when I distressed this. 
 This was the first coat! Super chippiness! 
And you can still see some of the tannins bleeding through. 
second coat and a coating of tung oil to lock it up
The sides really wanted to chip. So I went with it. 


 To tie in the wood with the outside, I made sure to leave some wood on the inside. 
I gave the bottom shelf a quick sand and stain, painted the shelves a white chalk paint, 
and the inner walls ASCP Provence. It looks more of a baby blue in the photos, but it's not. 
After the final light sanding to remove the excess chips, the whole beauty got a heavy coat of 
tung oil. The oil gets sucked up quickly. I might have done another coat. The following day
I waxed the whole shebang inside and out to seal her up! 
Seriously, that inner blue is not that blue! It's a shade darker than the outside color.
I love this new piece and had fun painting it. It's such a versatile piece. I was 
telling a friend that this would be awesome in a period style bathroom that had been
painted white and aqua with carrara marble (floors and tile in the shower and countertop), a crystal chandelier, and chrome fixtures. This would look cool in a spot to house towels and bathroom accoutrements. N'es pas?? 

kinda like this: instead of the toilet, put my hutch! LOL


Linking up at my fave parties!! :
Kammys Korner - Trash to Treasure Tuesdays
Domestically Speaking - The Power of Paint Party
The Shabby Creek Cottage - Transformation Thursday
Miss Mustardseed - Furniture Feature Friday
Funky Junk Interiors - Saturday Night Special
Knick of Time Interiors - Knick of Time Tuesday
My RePurposed Life                                        


Sunday, November 3, 2013

Feelin' some Blue


Love me some blue and gold! First, lets take a gander at this chunky monkey from the 
'70's. I've seen some of these done in bright bold lacquer colors. I love. Too bad we can't
do lacquer here in Cali. I used a semi-gloss enamel in this beautiful blue.
 Primer was a biggie on this one since it was that laminate-y type of finish. In retrospect, anytime 
you do a dark color, make sure you tint your primer. Any little divot and the white will show through. Even a dark gray would have been better than this white. I used my Command Max HVLP sprayer, for the first time in years, to spray the blue. I did a few coats, put it on the top shelf where it promptly fell 6 ft and shattered. Yep. Tried to fix it but it would not spray properly. I've been reading review for hours to  find a replacement. 


 And just because I didn't already do enough work, I decided on a little graphics to jazz it up.
Was going to try a Greek Key pattern, but I figured this was hard enough.
 Again, in retrospect, paint the base color first then you don't have to worry about taping twice!
  I didn't decide I wanted to do the pattern until after I had painted it blue. So, taped it off like you see, sealed the tape edges with the blue, then painted the gold.  When that dried, I reversed it.
  The photo below shows me sealing the tape edges with the gold. I did get very nice crisp lines.
This metallic paint is great. No complaints. 


I have loved to bring it inside to stage it for some pics, but I honestly have no place to put it. 

My next blue-ness is a night stand.
 I had seen one from TheeVelvetGlove and just loved the colors.
 She does some amazing and unique work.
Trying to distress with white underneath is a pain. I didn't want the white to show through. 
I used some turquoise chalk paint underneath some of the darker blue chalk paint.  I also used gold gilding wax to highlight the distressed areas and spray metallic for the metal parts. 


I think this is a cute little piece. I have the dresser that matches, but I'm not about to go about the process on that baby! Way too much work.  I just like to try out different techniques that come across. 
I realize this blue is not for everyone. But I love blues and greens! 
And as a painter, I think it's advantageous to explore other options and techniques, even though
 it may not be exactly your style. Besides, it's fun! I think it's cool for an eclectic accent piece. 
So, step outside the box once in awhile and do something different!

Linking up at my fave parties!! :
Kammys Korner - Trash to Treasure Tuesdays
Domestically Speaking - The Power of Paint Party
The Shabby Creek Cottage - Transformation Thursday
Miss Mustardseed - Furniture Feature Friday
Funky Junk Interiors - Saturday Night Special
Knick of Time Interiors - Knick of Time Tuesday
My RePurposed Life