Pages

Wednesday, September 26, 2012

Cherry Blossom tall dresser


I picked up this solid mahogany tall boy a few months back. I thought about doing it in black and white and had already primed the drawer fronts.  (I thought I had taken a before shot, but guess not.
This was your typical mahogany dresser with plenty of dings and scratches and broken hardware). 


But then I saw this one at Stilskin Studios...
....and I just had to have one!


I went with CeCe's "Vermont Slate" for the body and my own
turquoise chalk paint for the accents. 
The pinks are custom from acrylic paint of  pink and white, and Behr "Geranium" and white. 

I changed the angle while taking the below pic. 
Quite a difference in colors and saturation!


WARNING!!***PHOTO HEAVY BELOW****

 Like Stilskin, I too ordered my cherry blossom stencil from Royal Design Studios, as well as the bronze stenciling creme. 
The stencil is truly the best one I have ever used. Very strong. There are 5 sheets that depict
different branches and blossoms. And that stenciling creme is to die for! 
 I sanded down the top, stained with a dark walnut and used tung oil to finish it off. The right half
shows the tung oil, the left side raw.


 I had a little visitor while I was working.  Mr Mantis popped in one evening.

And if that weren't enough, I pulled out one of the drawers and found a molar cap wedged back there!
WTH??? How does someone misplace their tooth?????? EWWWWWWWWW!

 This piece had the neatest legs/feet. Talons gripping a ball! I did do some patch-repairs to the legs, but you can't even tell. 


In hindsight, I will never prime with white again unless I'm painting white. And yes, even with 
chalk paint you have to prime over this rich mahogany. It has a nasty habit of bleeding through. 
I went over key areas with my aqua (Behr "Gem Turquoise") before the Slate. 
 I had the hardest time with painting in this color! I must have painted the drawers 5-6 times each!
Everytime I lightly sanded, it just didn't look right. Splotchy. I tried everything. Even using steel wool.
I have never had such a time getting even looking coats. I used CeCe's because I love the way this
color gray waxes up. It's such a deep, rich charcoal, almost black.


The drawers got lined with 
complementary color fabric


And one last peek!


Sunday, September 9, 2012

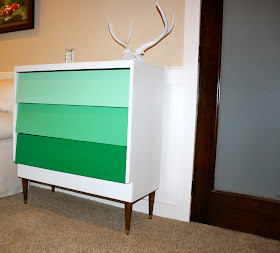
A Little Bit 'O Ombre Green Vintage!

I've been on a vintage kick lately.  There is just something about repurposing furniture from the 50's and 60's that is just fun!  What's really cool is all the straight lines. Yeah, I'm not gonna lie. It's so easy to to sand and finish flat, straight surfaces. So, take a gander at my newest re-do:

 This was nothing more than a chest. I had been wanting to try some ombre, but was waiting for 
the right piece.  I saw this puppy for a song on CL.  But I thought it would be oh so much better 
with some peg legs. Thanks eBay! Vintage legs! 
 The body was given a few coats of Antique White. 
I bought some kelly green for my base color. I used that on #3. 
The top and middle drawers were cut using the same white mixed w/the green.
I rolled the white, but brushed on the greens. 


All of the drawers are made from cedar. A quick sanding brought back the fresh smell. 


I gave the top about 4 thin coats. I always mix my latex with Floetrol. 
 The antlers are the real deal, compliments of my hubs many hunting trips. 
They were primed and coated with Glossy White spray paint. 

This little vintage piece would be a great accent in any room.  It's going up for sale!!

Sharing at all my faves plus : betweennapsontheporch.net , my uncommon slice of suburbiaThe Dedicated House new house new home new lifeCoastal CharmThe Shabby Creek CottageFrom my front porch to yours, House of Hepworths

Tuesday, September 4, 2012

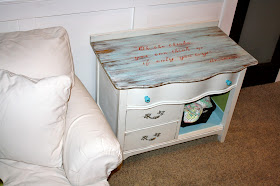
Dr Seuss nursery dresser

When I went to pick this little guy up from a CL ad, I didn't think it was quite 
this small!! People must have been tiny a century ago!  I believe this is an
old commode dresser or something.  I thought it would look cute in a baby's room.
 While transporting this in my truck, the little door snapped apart. I thought rather than repair it (it didn't close properly anyway) I would paint it inside and leave it open for a basket.  It was in rough shape!
After much repair......voila'


Sooooooo, here was the process...

Saturday, September 1, 2012

Peacock table

So I found these great solid maple pieces on CL. Two large chests/dressers and this 
cute little side table.  I felt sort of sheepish because as the lady was helping me load them
into my truck she said, "I'm so glad these are going to someone who appreciates their beauty and won't
paint them." !!! ouch.....